 메프도의 요약노트

Pod에 문제가 발생하여 종료되었을때,
어떻게 시스템을 안정적으로 유지할 수 있을까?
그에 대한 기본 내용인 ReplicaSet에 대해 이해해보자
▼ 요약지 다운로드 ▼
4.ReplicaSet.pdf
drive.google.com
Pod 복제본 생성 및 관리 방안
: 생성 명령 N번 대신 희망 Pod 개수를 replicas 속성으로 선언
- Pod 특징 : 문제 발생 시, 종료. 복구 X
> 문제가 발생하더라도 정상 기능 수행 가능해야함
=>: 사람의 개입 없이 내결함성을 가진 SW에 대한 욕구
- 극복 : ReplicaSet을 이용한 Pod 복제 및 복구 자동화
> 클러스터 관리자가 ReplicaSet을 생성해 필요한 Pod 개수 정의
> 쿠버네티스가 replicas를 읽고 그 수만큼 Pod 실행 보장
- 선언 내용
> Replicas : 복제본 개수
> Pod Selector : 어떤 파드인가(label 선언)
> Pod Remplate : Pod yaml 대체

* 결함 감내 시스템(Fault tolerance)
: 시스템을 구성하는 부품의 일부에서 결함 또는 고장이 발생하여도 정상적 혹은 부분적으로 기능을 수행할 수 있는 시스템
ReplicaSet 선언 형태

- ex) blue-app 관리
> blue-app label이 붙은 pod에 대해서 3개가 유지되어야 함을 명시

 |
 |
> 다른 Pod는 종료되어도 관리하지 않음
> spec.replicas의 미선언 시의 기본값은 1임
- ex) template 속성의 예시
> template의 경우 기존 pod선언시의 yaml과의 내용이 같다.

> template의 labels은 replicaset과 동일해야함
> kind와 apiVersion은 적지 않음
관련 명령어 집합
- ReplicaSet 생성
| kubectl apply -f <file-directory> |
- ReplicaSet과 배포 이미지 확인
| kubectl get rs <replicaset-name> -o wide |
- Pod 목록과 배포된 노드 확인
| kubectl get pod -o wide |
- ReplicaSet의 Pod 생성 기록 확인
| kubectl describe rs <replicaset-name> |
- ReplicaSet의 Pod 생성 이후 과정 확인
| kubectl get events --sortby=.metadata.creationTimestamp |
- ReplicaSet 파드로 트래픽 전달
| # 포트포워딩 8080 -> 8080 (ReplicaSet에 의해 생성된 파드로 트래픽 전달) kubectl port-forward rs/<replicaset-name> 8080:8080 |
실습 진행
: ReplicaSet 기본 생성
Q. 주어진 조건을 통해 replicaset.yaml작성
| # ReplicaSet API 버전: apps/v1 # ReplicaSet 이름: blue-replicaset # ReplicaSet replicas: 3 # Pod 템플릿 레이블: app=blue-app # 컨테이너 이름/포트: blue-app(8080) # 도커 이미지: yoonjeong/blue-app:1.0 env: - name: NODE_NAME valueFrom: fieldRef: fieldPath: spec.nodeName - name: NAMESPACE valueFrom: fieldRef: fieldPath: metadata.namespace - name: POD_IP valueFrom: fieldRef: fieldPath: status.podIP resources: limits: memory: "64Mi" cpu: "50m" |
A. replicaset.yaml 작성 내용
| apiVersion: apps/v1 kind: ReplicaSet metadata: name: blue-replicaset # 레플리카 이름 spec: # 사양 정의 replicas: 3 #일단 3개 Pod를 가져야 하고 selector: # 어떤 거 들고 올거냐면 matchLabels: # 라벨이 app: blue-app # blue-app인 걸 가져올거야 template: # 그 blue-app이란 녀석은 내가 선언하는데 metadata: # 당연하게도 labels: # 라벨이 app: blue-app # blue-app 일거고 spec: # 어떤 사양을 가지냐면 containers: # 이 컨테이너를 가지는데 - name: blue-app # 컨테이너 이름도 blue-app이고 image: yoonjeong/blue-app:1.0 # 이 이미지를 씀 ports: # 포트는 - containerPort: 8080 # 8080으로 잡아줘 |
2) 작성한 replicaset 적용
| kubectl apply -f .\source\replicaset.yaml |

3) 적용 내용 확인법
3-1) pod의 정보를 확인
| kubectl get pod -o wide |

> 작성한 replicaset의 이름에 임의의 5개 문자열을 붙여 이름 지정
3-2) replica set에서 발생한 이벤트 확인
| kubectl describe rs blue-replicaset |

> Events 에서 3개의 Pod가 생성됨을 확인
3-3) 쿠버네티스에서 발생한 모든 이벤트를 확인
| kubectl get events --sortby=.metadata.creationTimestamp |

> 현재까지 진행되었던 모든 흐름이 기록됨을 확인
4) 포트포워딩을 통한 접근
| kubectl port-forward rs/blue-replicaset 8080:8080 |


실습 진행
: 기존에 생성된 Pod를 ReplicaSet으로 관리해보자
※ 기존 replicaSet은 아래를 참고해 삭제 후 진행
| kubectl delete rs/blue-replicaset kubectl delete rs --all |
1) yaml 작성: blue-app.yaml
| apiVersion: v1 kind: Pod metadata: name: blue-app labels: app: blue-app spec: containers: - name: blue-app image: yoonjeong/blue-app:1.0 ports: - containerPort: 8080 env: - name: NODE_NAME valueFrom: fieldRef: fieldPath: spec.nodeName - name: NAMESPACE valueFrom: fieldRef: fieldPath: metadata.namespace - name: POD_IP valueFrom: fieldRef: fieldPath: status.podIP resources: limits: memory: "64Mi" cpu: "250m" |
> label 설정이 blue-app 임을 상기
2) 배포
| kubectl apply -f blue-app.yaml |

3) pod가 하나만 존재함을 확인
| kubectl get pod |

4) replicaSet 배포: replicaset.yaml
> 이전 실습에 이용한 replicaset.yaml이용
| kubectl apply -f replicaset.yaml |

5) 생성된 pod 확인
kubectl get pod
> 생성된 pod가 총 3개임을 확인

Why?
| replicaset의 설정에서 selector의 범위는 라벨이 blue-app인 pod였다. 직접 생성한 pod와 replicaset이 생성한 pod 모두 동일한 blue-app 라벨을 가진다. 따라서 replicaSet은 2개의 pod만을 생성하게 되었다. |
| kubectl describe rs blue-replicaset |

ReplicaSet 삭제 기법 차이
- Pod와 ReplicaSet 모두 삭제
| kubectl delete rs/blue-replicaset |
- ReplicaSet만 삭제 : 고아 전략
| kubectl delete rs blue-replicaset --cascade=orphan |
- Gracefully하게 ReplicaSet과 Pod 삭제하기
| kubectl scale rs/blue-replicaset --replicas 0 kubectl delete rs/blue-replicaset |
> scale명령으로 Pod 먼저 제거 후, ReplicaSet 제거
* orphan : 고아
ReplicaSet의 Pod Template 변경
: Template 값이 변경되어도 기존 Pod에는 영향을 주지 않음
- 기존 Pod의 변경 시점 : replicas값이 변경될 시에만
- 생각 해볼만 한 상황
1) ReplicaSet의 Template의 레이블 업데이트 : 변경X
2) ReplicaSet의 replicas 값을 증가하여 업데이트 : 변경O
=> 새로운 Pod은 업데이트한 Template 정보를 따라 생성됨
3) Pod를 하나 삭제함 : 변경O
=> 새로운 Pod은 업데이트한 Template 정보를 따라 생성됨
- 짤막 실습
1) 레이블 변경(env=production 추가) 이후 pod

2) 8gf8h 삭제

3) 새로 생긴 pod 정보 확인

> 새로 생긴 pod는 변경된 레이블을 따르는 모습
ReplicaSet의 Replica 수 변경
- replicas 변경
| kubectl scale rs myapp-replicaset --replicas=3 |
ReplicaSet의 롤백
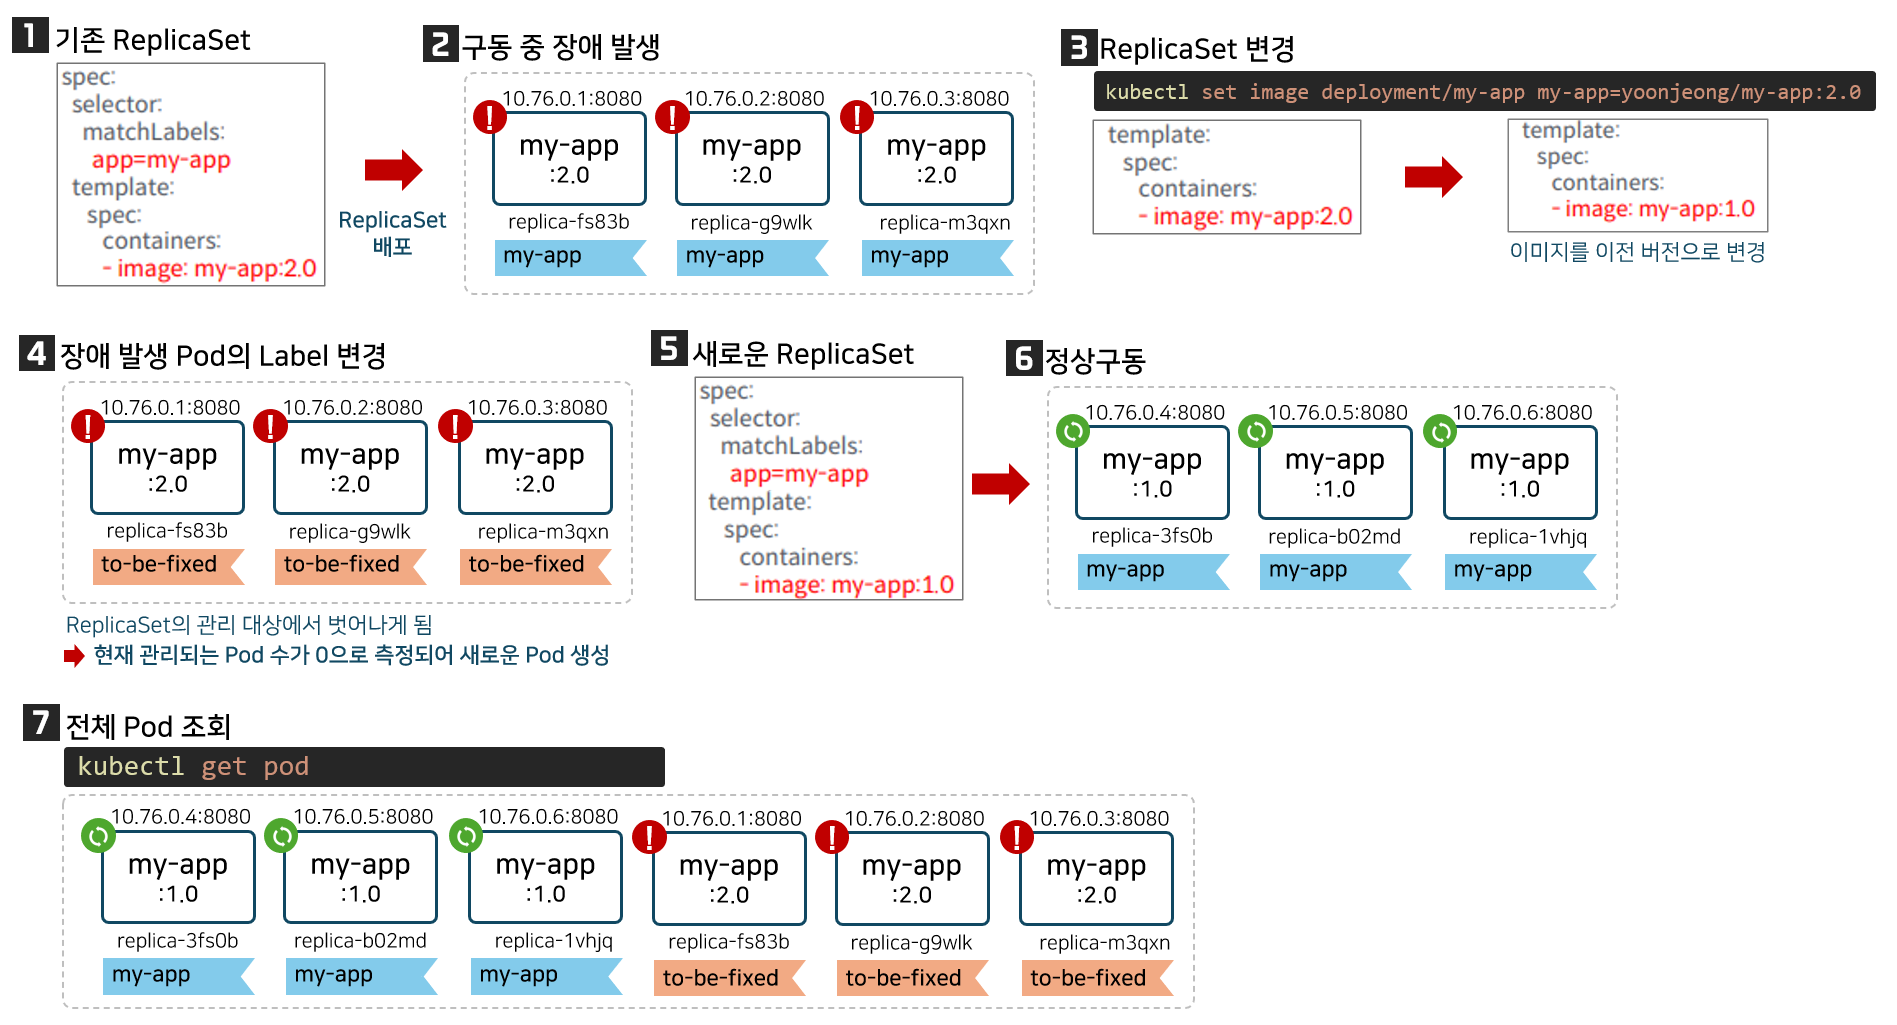
- 기법(1) : Pod Template 이미지 변경을 이용한 롤백
> 실행중인 Pod 장애 시, ReplicaSet 새로 생성 X 이전 버전 Pod 배포
1) ReplicaSet에 관리되는 Pod 장애 발생
2) unmanaged Pod로 변경 후 디버깅
- 기법(2) : ReplicaSet의 replicas 조정을 통한 롤백
> 관리하는 모든 Pod를 새로운 버전으로 변경
ReplicaSet의 롤백
: Pod Template 이미지 변경
1) 새로 배포된 이미지를 이용해 Pod를 배포한다.
| kubectl apply -f deployment.yaml |

> 구동중 Pod 장애가 발생함을 인지함
2) ReplicaSet 변경
| kubectl set image deployment/my-app my-app=yoonjeong/my-app:2.0 |
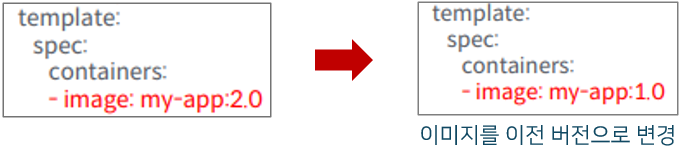
> 정상 구동이 확인되었던 이전 버전 이미지로 template값 변경
2-1) 변경 사유 작성
| kubectl annotate deployment/my-app kubernetes.io/change-cause="image updated to 2.0" |
3) 장애 발생 Pod의 Label 변경
| kubectl label pod myapp-replicaset-fs83b app=to-be-fixed --overwrite |

3-1) 레이블을 변경한 Pod의 owner확인
| kubectl get pod <pod-name> -o jsonpath="{.metadata.ownerReferences[0].name}" |
> Label 변경으로 ReplicaSet의 관리범주에서 빠짐
> owner 오브젝트가 존재하지 않아, 출력결과 없음
4) Replicas 설정에 따른 새로운 Pod 구동

> 새로 구동된 Pod는 변경된 Template 설정을 따름
> 2.0이 아닌 1.0이미지를 이용해 구동
5) 전체 Pod 조회
| kubectl get pod |

> 관리되는 Pod 3개, 미관리 Pod 3개 총 6개의 Pod가 존재하게 됨
ReplicaSet의 롤백
: Pod Template 이미지 변경 (축약)
* 나 이미지 왕 잘그렸다 히히
ReplicaSet의 롤백
: ReplicaSet의 replicas 조정
1) ReplicaSet의Pod 수를 0으로 변경
| kubectl scale rs myapp-replicaset --replicas 0 |
2) ReplicaSet 변경
| kubectl set image deployment/my-app my-app=yoonjeong/my-app:2.0 |
3) ReplicaSet의Pod 수를 기존 개수로 변경
| kubectl scale rs myapp-replicaset --replicas 3 |
ReplicaSet의 롤백 과정의 시사점
- 관리해야 하는 버전이 많다면 어떤 버전으로 롤백 해야할까
- 배포-시작-구동까지 서비스 중단 발생
=> 롤백/배포의 자동화 방안 도입 필요
전체 요약 다시보기
4.ReplicaSet.pdf
drive.google.com
'기술 단어장 > Kubernetes' 카테고리의 다른 글
| [k8s] Pod에 대한 통합 엔드포인트, Service (0) | 2024.03.04 |
|---|---|
| [k8s] Deployment를 이용한 배포전략 (0) | 2024.03.04 |
| [k8s] Pod 환경 변수 설정 및 Pod간 통신 구현 (0) | 2024.02.29 |
| [k8s] 쿠버네티스의 등장 배경부터 Pod 개념까지 (0) | 2024.02.28 |
| [네트워크] 쿠버네티스(Kubernetes)는 어디에 사용할까? (0) | 2021.07.08 |


댓글